FROM THE COMMUNITY COLLECTION
Collections 2
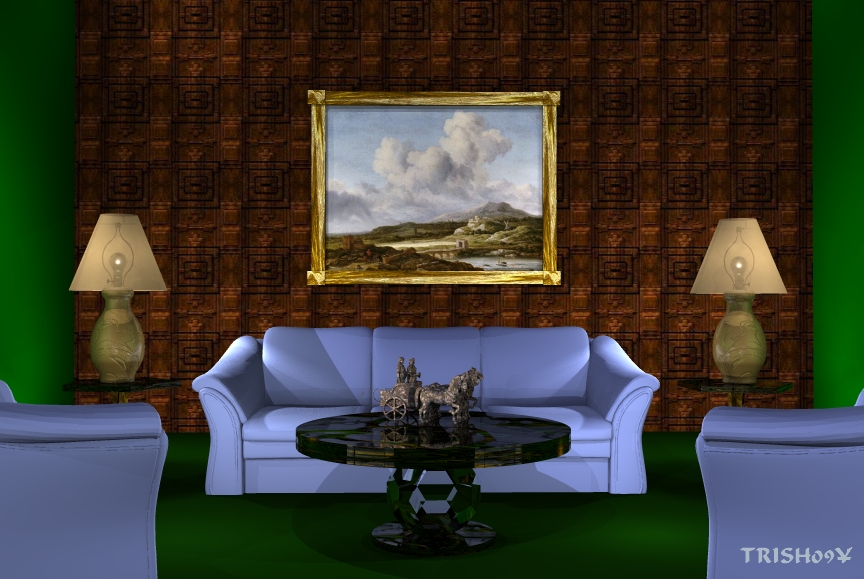
The painting is on loan from the Lourve. The Ray of Sunlight by Van Ruisdael is from the 1600's. It was in Louis 16th collection and purchased at auction in 1748.I think I went a little too far with the lampshades, I made use of Horos reversed lighting I didn't keep track this time of how many lights...I could only render with single AA because I wanted it on super and the time on that came out to be around 10 hrs I knew my computer would not make that with Bryce6 acting out.
Loading unique views3,279 unverified legacy hits0.0 archived rating2009-07-11 added
Comments 5
A conversation around the artworkSign in to join the conversation.
I really like the effects you achieved with the lamps, the light bulbs are perfect for the lamp shade. I also like the little statue on the table. Pretty cool, great job Trish.
You received rich opinions I agree with. Now I'm anxious to see the improved version of your interior shot, bullit.
Yes I discovered with your help that the shadows are off, darn it.
Rashad said it all - actually a lot more than what I would have said. Apart from his quibbles, this is a nice room and I like the colour combination. It's just the wall with the Van Ruisdael is not good. It ought to be a simple plain wall to make the artwork stand out. On the current "nervous" wall, it almost gets drawned. However, the wall complements the green ones left and right and gives some warmth to the room. It's just that this beautiful picture doesn't fit on it. Perhaps another camera angle to have the right corner nearer to the vertical centerline and than have it white instead of green (the carpet is already green). The picture could be put up there. But if you do this, I will probably complain that the Van Ruisdael should not be moved to one side, out of focus for the beholder.
A couple of thoughts... Very goods use of the inversed gradeint effect. No one can tell how many indirect lights there are nor where they are positioned. I wonder though, if something has gone odd with the shadows again. Have you turned off shadows in the light lab or have you lowered shadow intensity below 75%? These shortcuts if used could send you a step backward even if the lack of shadow rays makes the render seem faster. Though shadow bands seem ugly, they are somehow still required. without them the light from the cluster will be too flat and it will not accent the geometry of the models in the scene. The lamps are almost perfect. I realize that to get them to glow as they should you actually need the foliage transparency trick. Rather than write out how to apply it in this situation, I will send you an e-mail with a lamp included to demosntrate how this is done. On the issue of AA. I often see people say they rendered their sceens in superfine and premium when it is unnecessary in most cases. Superfine is almost pointless, unless you have ribbing of fabric threading or some other issue with alot of thin lines that are parellel, Superfine helps to iron those out, nothing else. it does not really lend anything tangible to a render overall. So what you should do is render the entire scene in Standard AA, then go back and plop render those messy details in Superfine. This is much faster than rendering the entire scene in superfine. Remember that the default AA quality in Bryce is much higher than the default qualities in most apps. I have found that premium render settings below 16rpp actually can look worse than standard AA, with nasty jagged edges. My theory is to light and texture the scene convincingly first, and worry about the render quality as the icing on the cake. 9 times out of 10 once the scene is properly lit you will not be able to use high render quality settings because the time will be too long. Sad fact. My most recent interior was rendered in standard AA and it still took days to complete. Superfine would have taken well over a week, hardly worth the wait. I did plop render certain areas where lines were too jagged in superfine AA btw. Also, Open House has over 1000 radials floating around between the two floors, it also has IBL skylight coming in through the windows at a setting of 1024, and a soft shadow sunlgiht made of about 146 radials. I was pushing the limits on smoothing out the indirect light with losts of lightsources. The house is 2 stories so there are roughly 500 radials floating at each level, thus many of them are not seen directly. I found it easier to light the entire house instead of just the visible rooms. but then I am running a supercomputer, most other people are not. Lastly, make sure you have gamma correction turned OFF in the render options. This effect brightens scenes far too mcuh, better to apply gamma correction in post work where you have control instead of Bryce. You will see the example I send to you later today. If your e-mail is not easily found, please send me your e-mail in a message of some sort. My email is available. You need to apply mesh smoothing to the sofas, I can see the geometric facetting along the armrests. Later for now, and nice work Bullit!